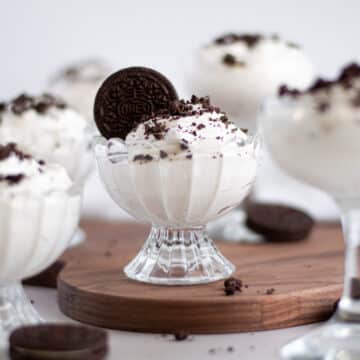
Oreo balls are an easy yet fancy-looking no bake treat that’s always a crowd favorite! With just three simple ingredients and about 45 minutes from start to finish, these bite-sized delights taste like Oreo cheesecake in delicious, poppable truffle form. What makes our recipe special is that I’ve extensively tested it over the years to get the exact ratios right and confirm important questions like whether you can use low-fat cream cheese (you can!).
As someone who’s developed over 60 dessert recipes for this website (and counting!), I have a particularly long history with this recipe. I had my first Oreo ball in college when our group of friends hosted our first “fancy holiday party”, and I immediately fell in love. Over the past 20+ years, I’ve made multiple batches of Oreo truffles each holiday season to share with family, friends, and coworkers. Through all that repetition, I’ve learned what works and what doesn’t when it comes to making this treat and am sharing all those details with you!
While these are a lovely holiday treat, they’re also wonderful for parties of all kinds, game nights, baby showers, and bridal showers. My detailed step-by-step instructions and tips will help you make an excellent batch of Oreo balls the first time, benefiting from my two decades of experience so you don’t have to learn through trial and error.
Why You’ll Love This Oreo Truffle Recipe!
Very easy to make! A great recipe for the beginning baker or to make with kiddos!
Like Oreo cheesecake, but bite-sized. Bite sized desserts are always a winner in my book! These Oreo truffles taste very similar to an Oreo cheesecake.
Quick to make. From start-to-finish, it will take you approximately 45 minutes to make these Oreo balls. This includes your prep time, making the filling, chilling in between steps, and dipping the Oreo balls in the chocolate (and optional decoration).
Oreo Truffle Ingredients
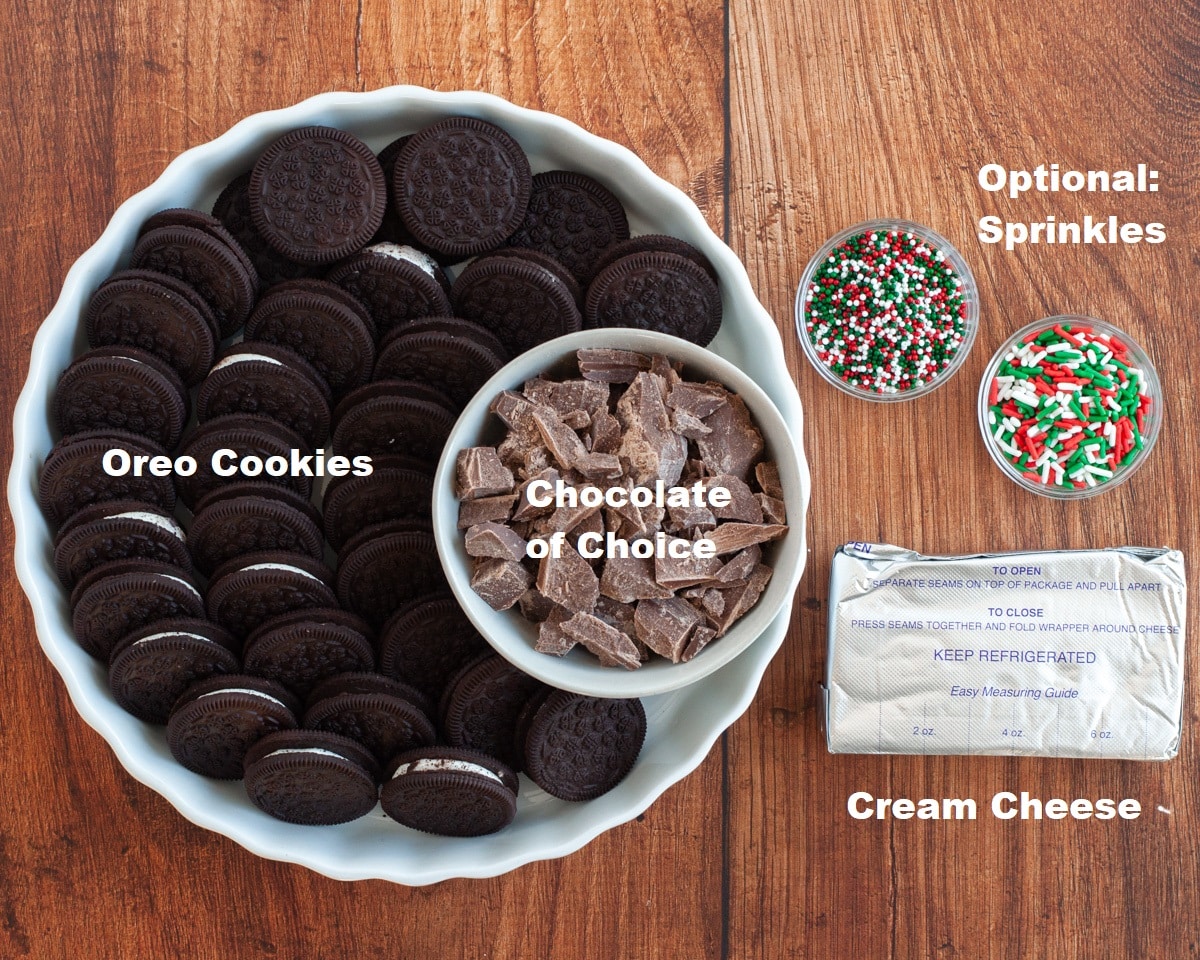
- Oreos: use regular Oreo cookies for this recipe (although double-stuffed are great for eating, they make your Oreo truffles fall apart).
- Cream Cheese: using regular cream cheese is often recommended when making Oreo balls because it creates a creamier, richer truffle. If you choose to use low-fat cream cheese, just be aware that the texture may not be quite as creamy or as thick as you were expecting. I’ve used both types of cream cheese for this recipe and the Oreo truffles turned out great with both.
- Chocolate: this is the fun part! Oreo cream cheese balls are totally customizable; you can use dark chocolate, white chocolate, semi-sweet chocolate, almond bark, chocolate melts…whatever chocolate you like (or happen to have in your pantry).
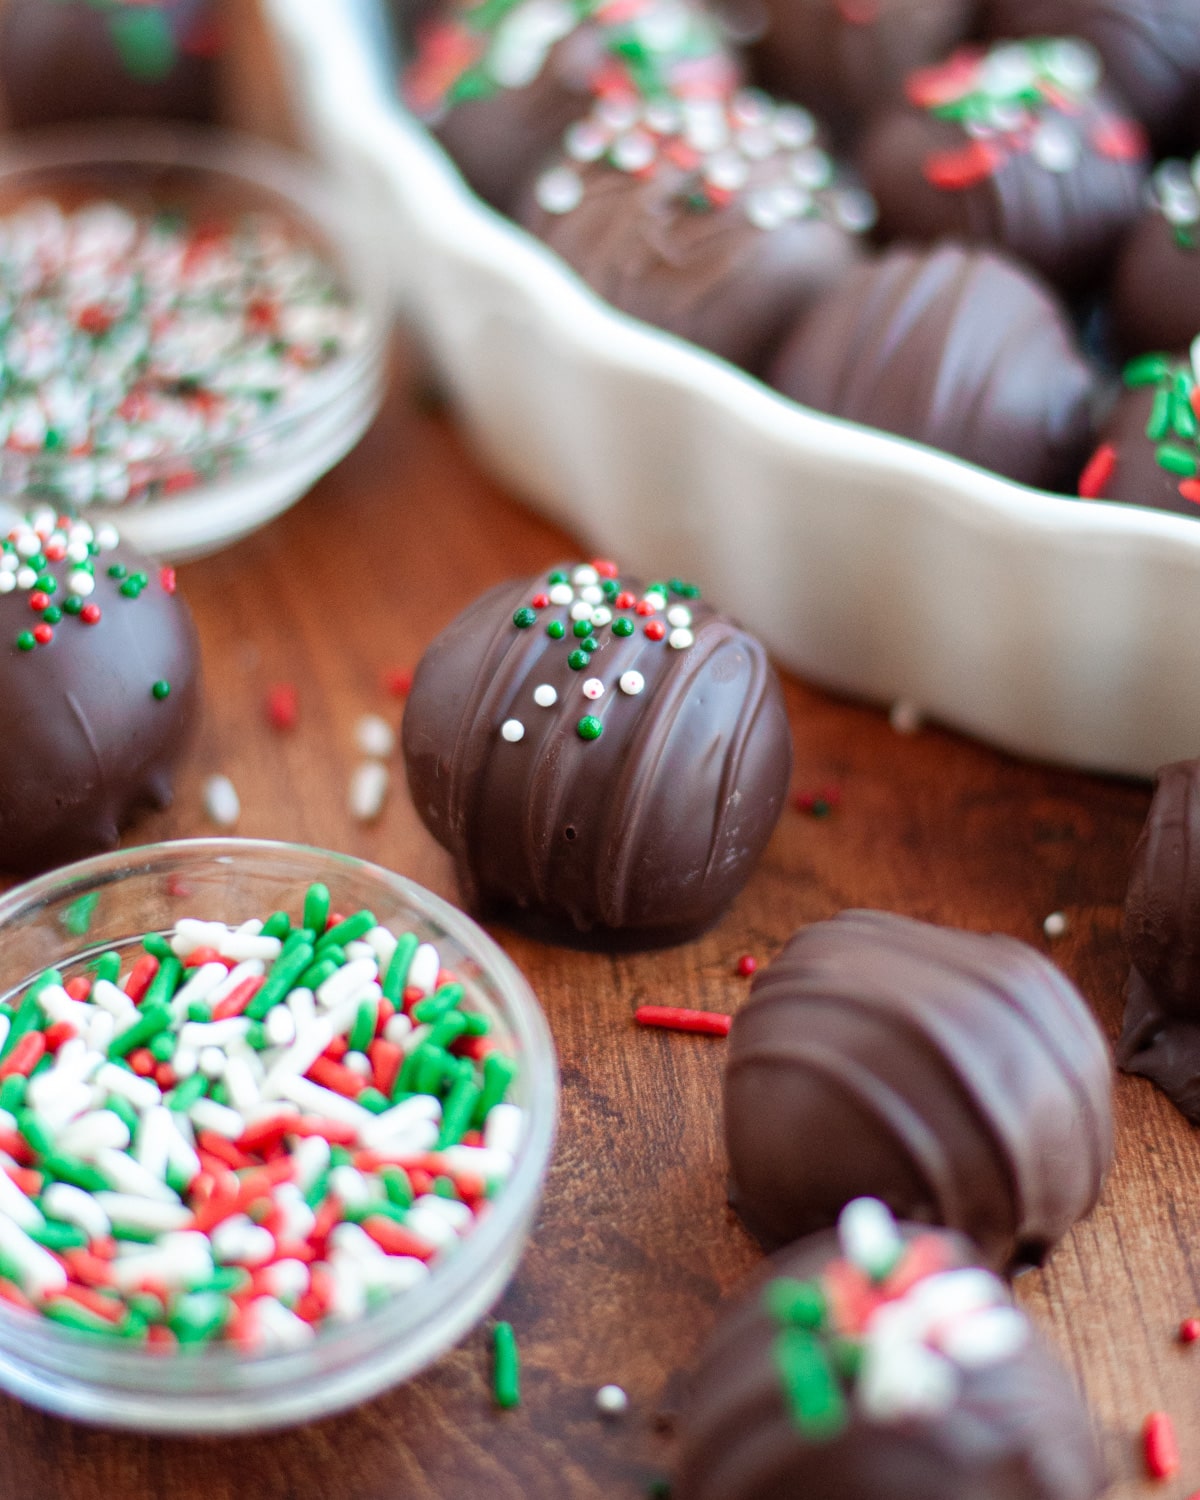
- Optional Decorations: I personally like to top my Oreo balls with sprinkles, because sprinkles make everything more fun! Other topping ideas include: drizzled chocolate of a different variety (example – if you dipped in dark chocolate, drizzle in white chocolate), additional crushed Oreos, chopped nuts, coconut, crushed candies…let your imagination run wild and have fun with it!
See recipe card below for a full list of ingredients and measurements.
Oreo Truffle Balls Tools
- A good quality food processor makes this recipe extra quick and easy to make!
- A small cookie scoop helps you get your Oreo truffles to all be the same size!
How to Make Oreo Truffle Balls
Line a cookie sheet with parchment paper and set it aside.
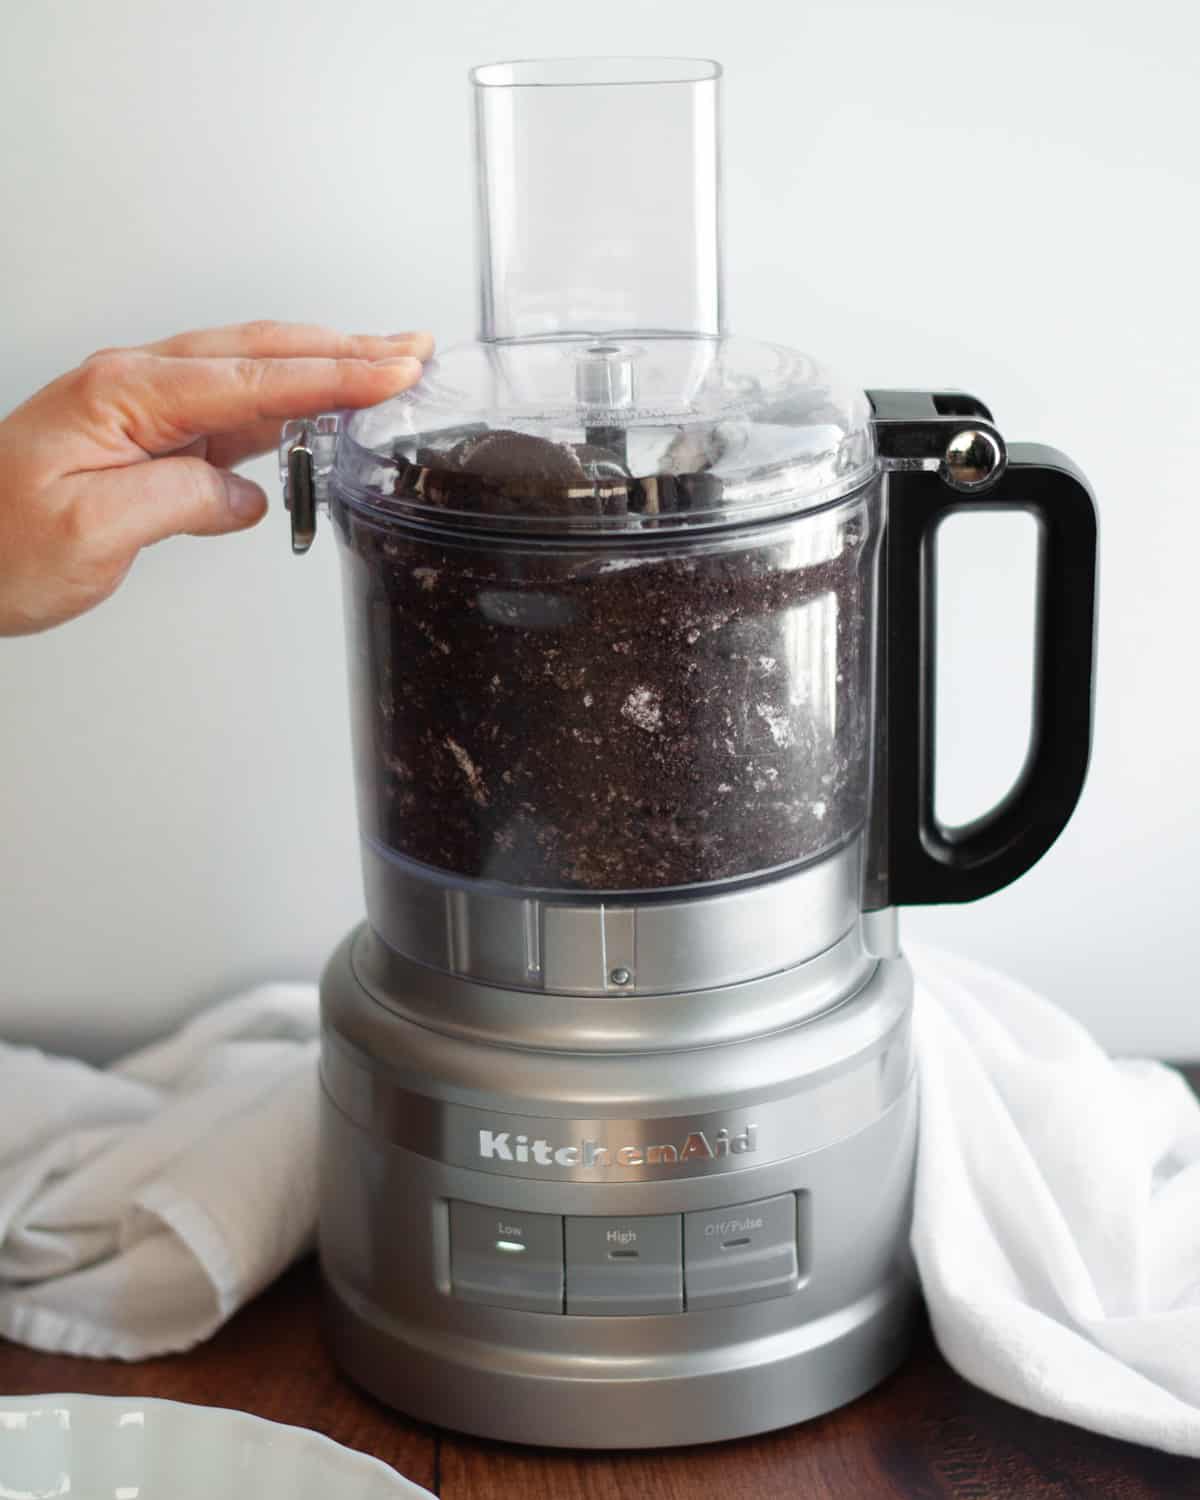
Crush the Oreo cookies. I like to use a food processor to do this, but you can also use a blender or manually by placing your cookies in a bag and crushing with a rolling pin.
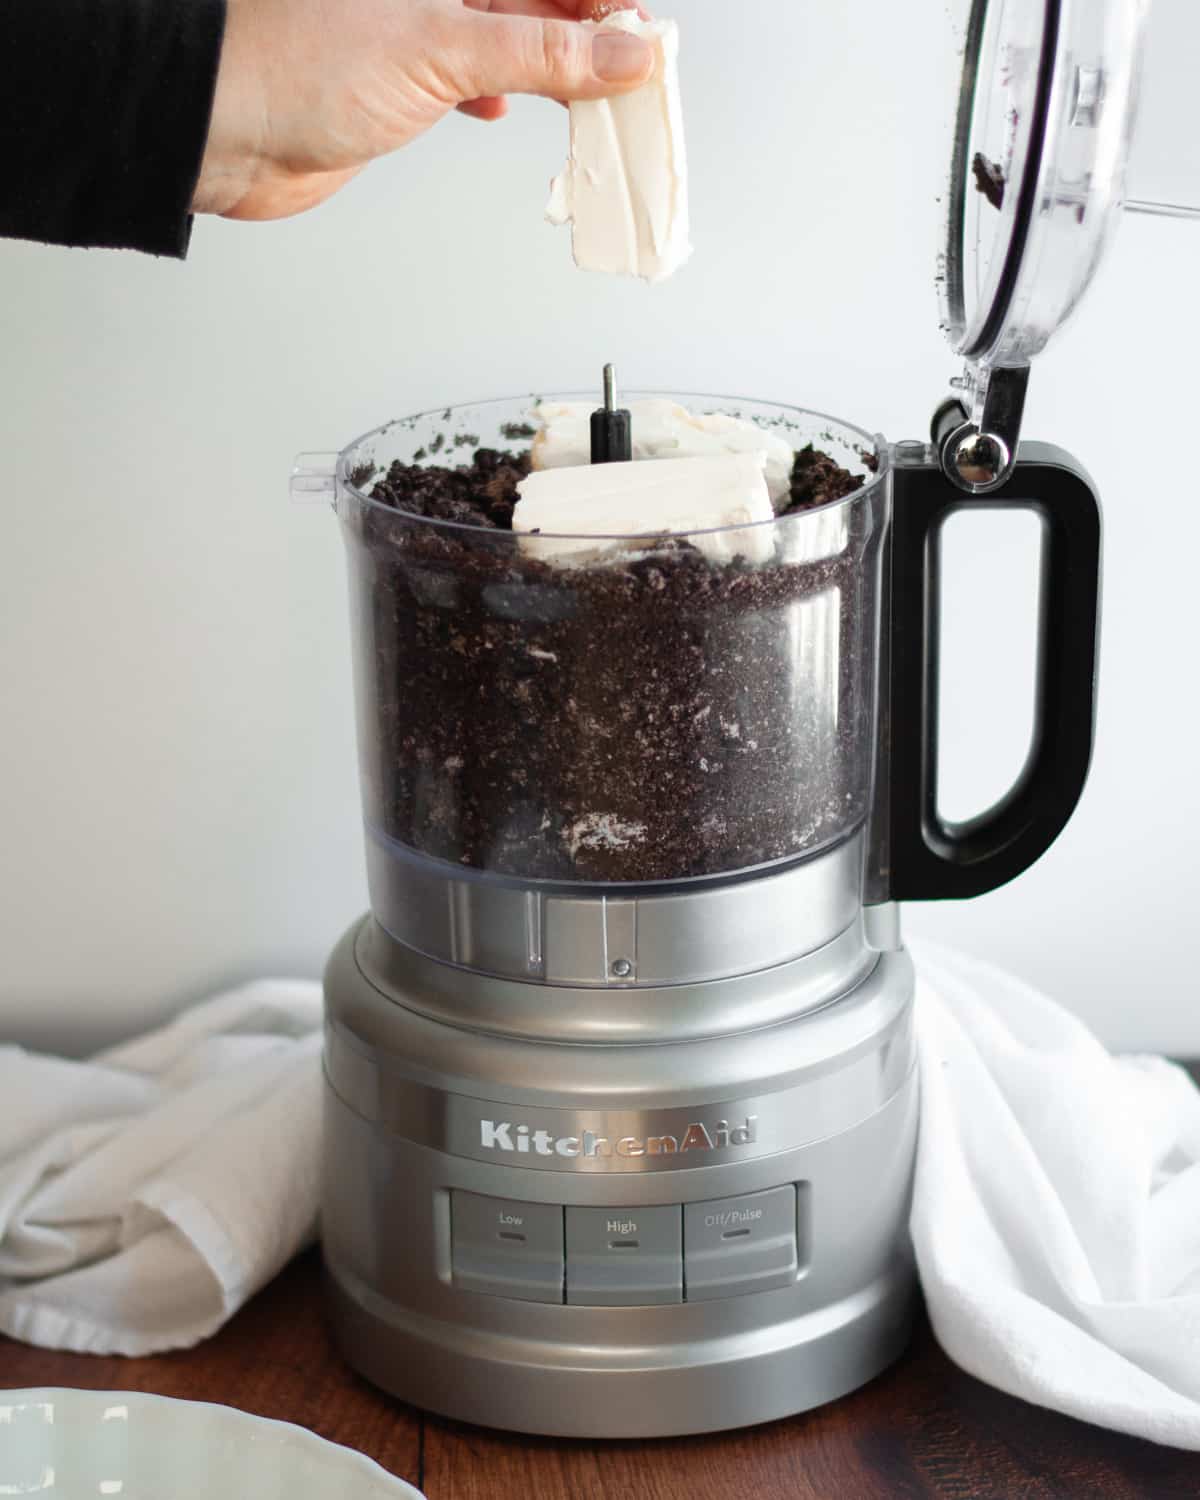
Mix the crushed Oreos with softened cream cheese. If using a food processor or blender, scrape down the sides as needed.
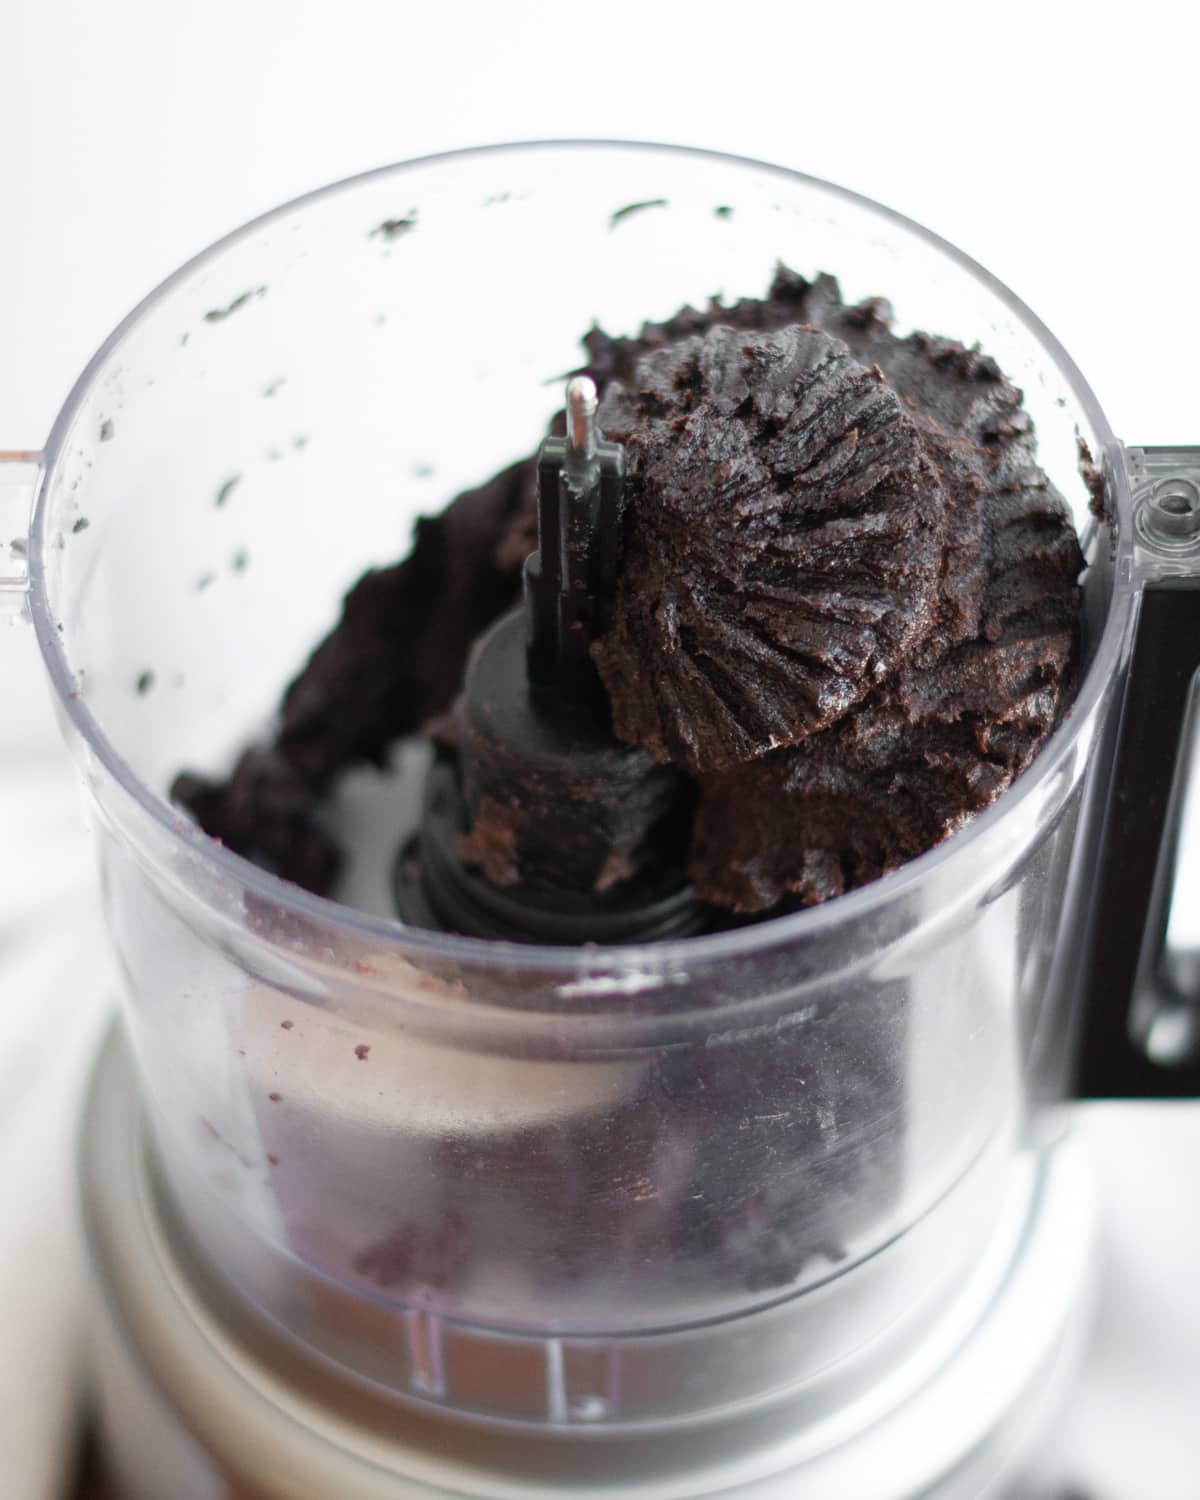
Continue to mix until a consistent, smooth filling is created. If the filling seems dry, add more cream cheese in ½ ounce increments.
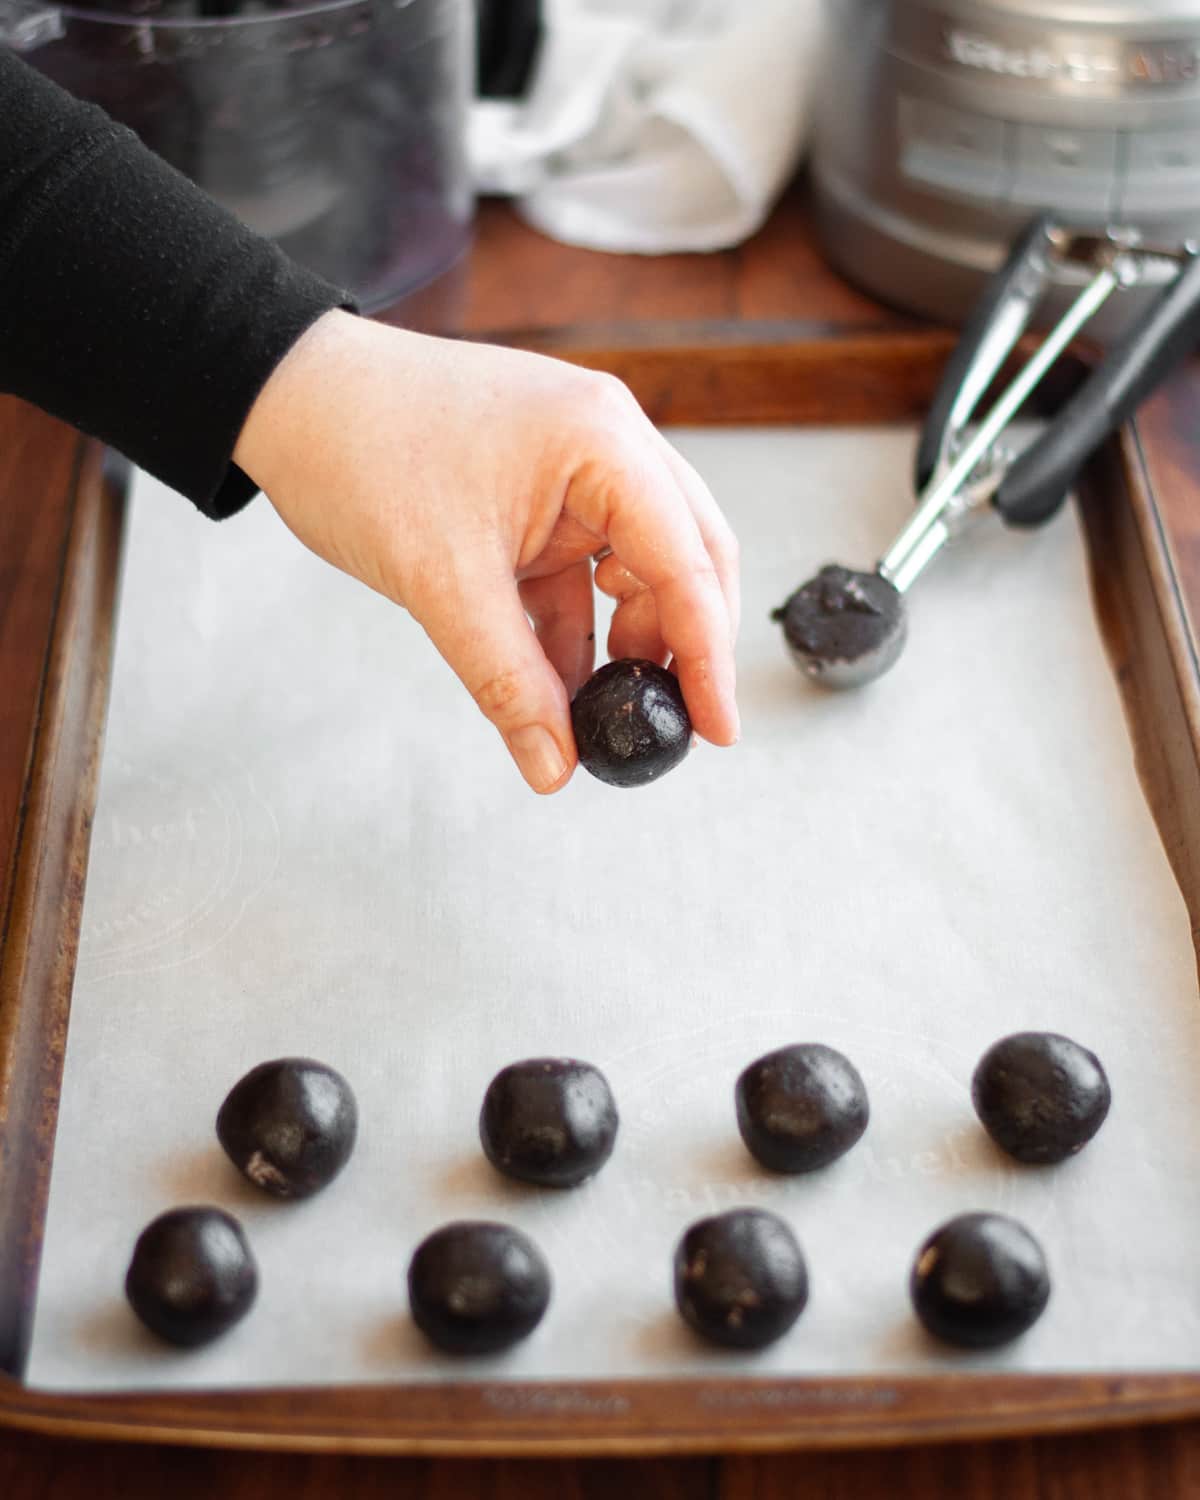
Scoop your filling and roll into 1” balls and place on your lined baking sheet. I use a small cookie scoop to get mine all the same size. Chill balls for 10-15 minutes in the refrigerator (or freezer) to set up before dipping.
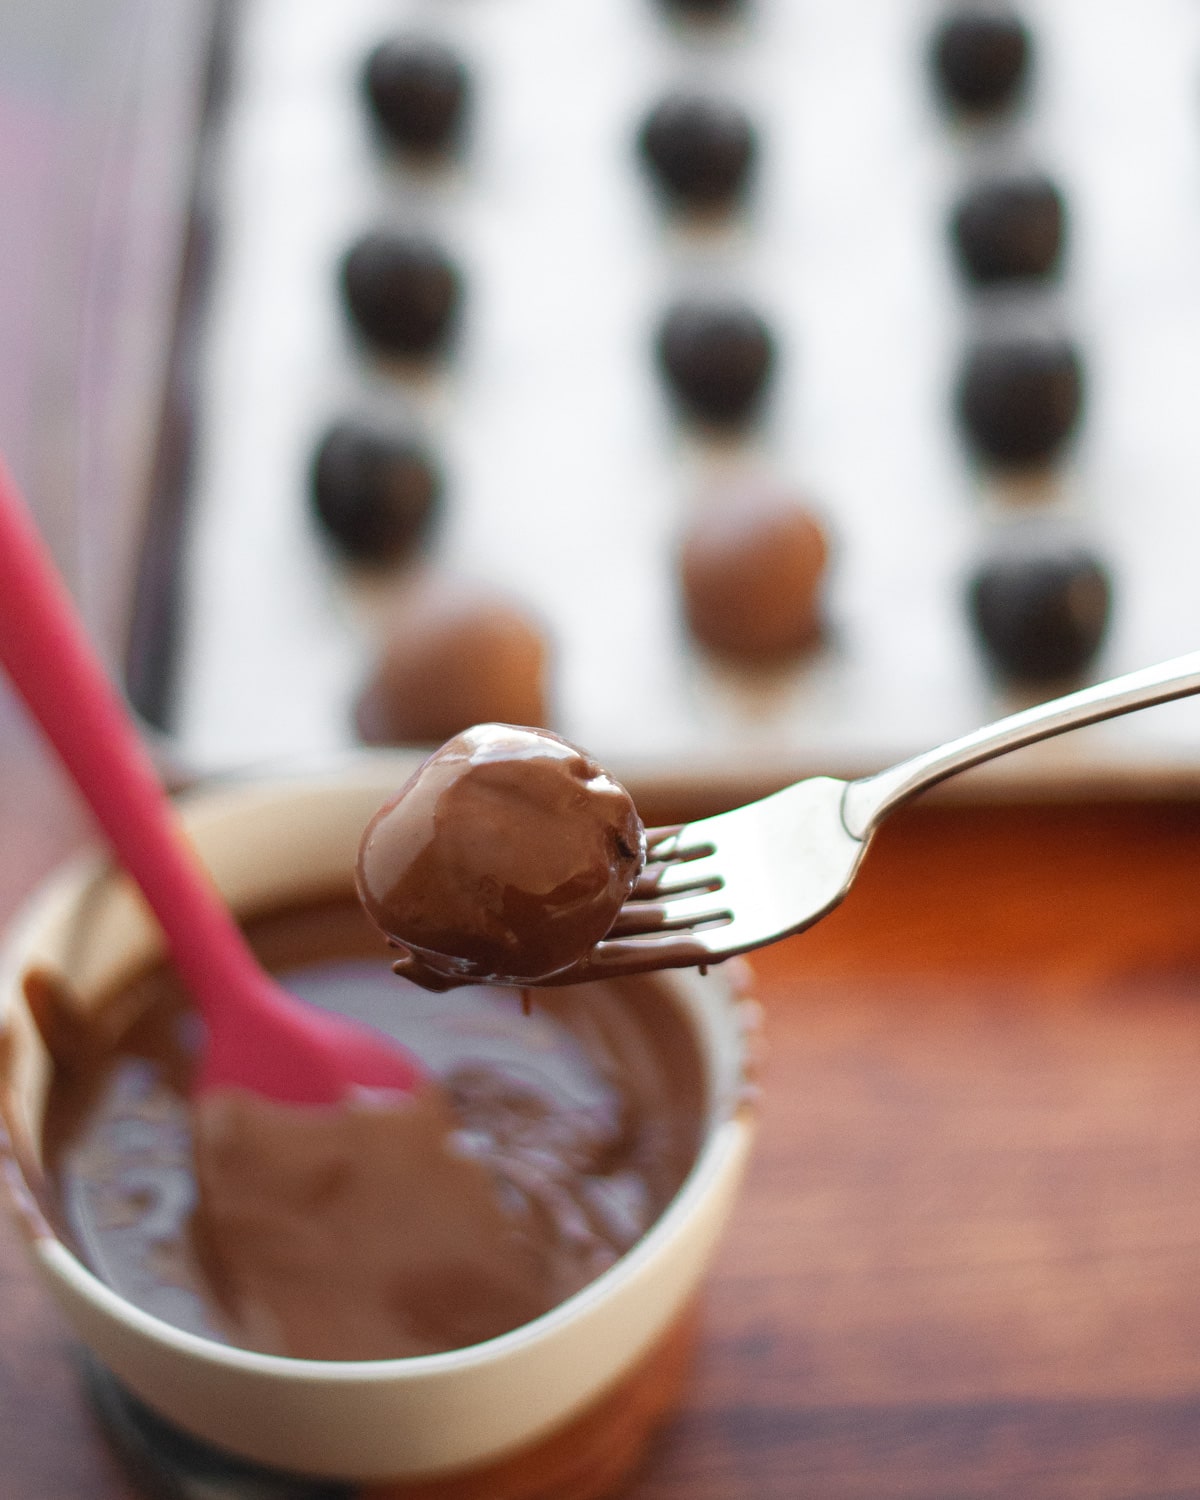
When the truffles are firm, melt the chocolate of your choice (either using the double boiler method or in 20-second increments in the microwave). Dip each ball in the chocolate until well coated. Place back onto the lined baking sheet.
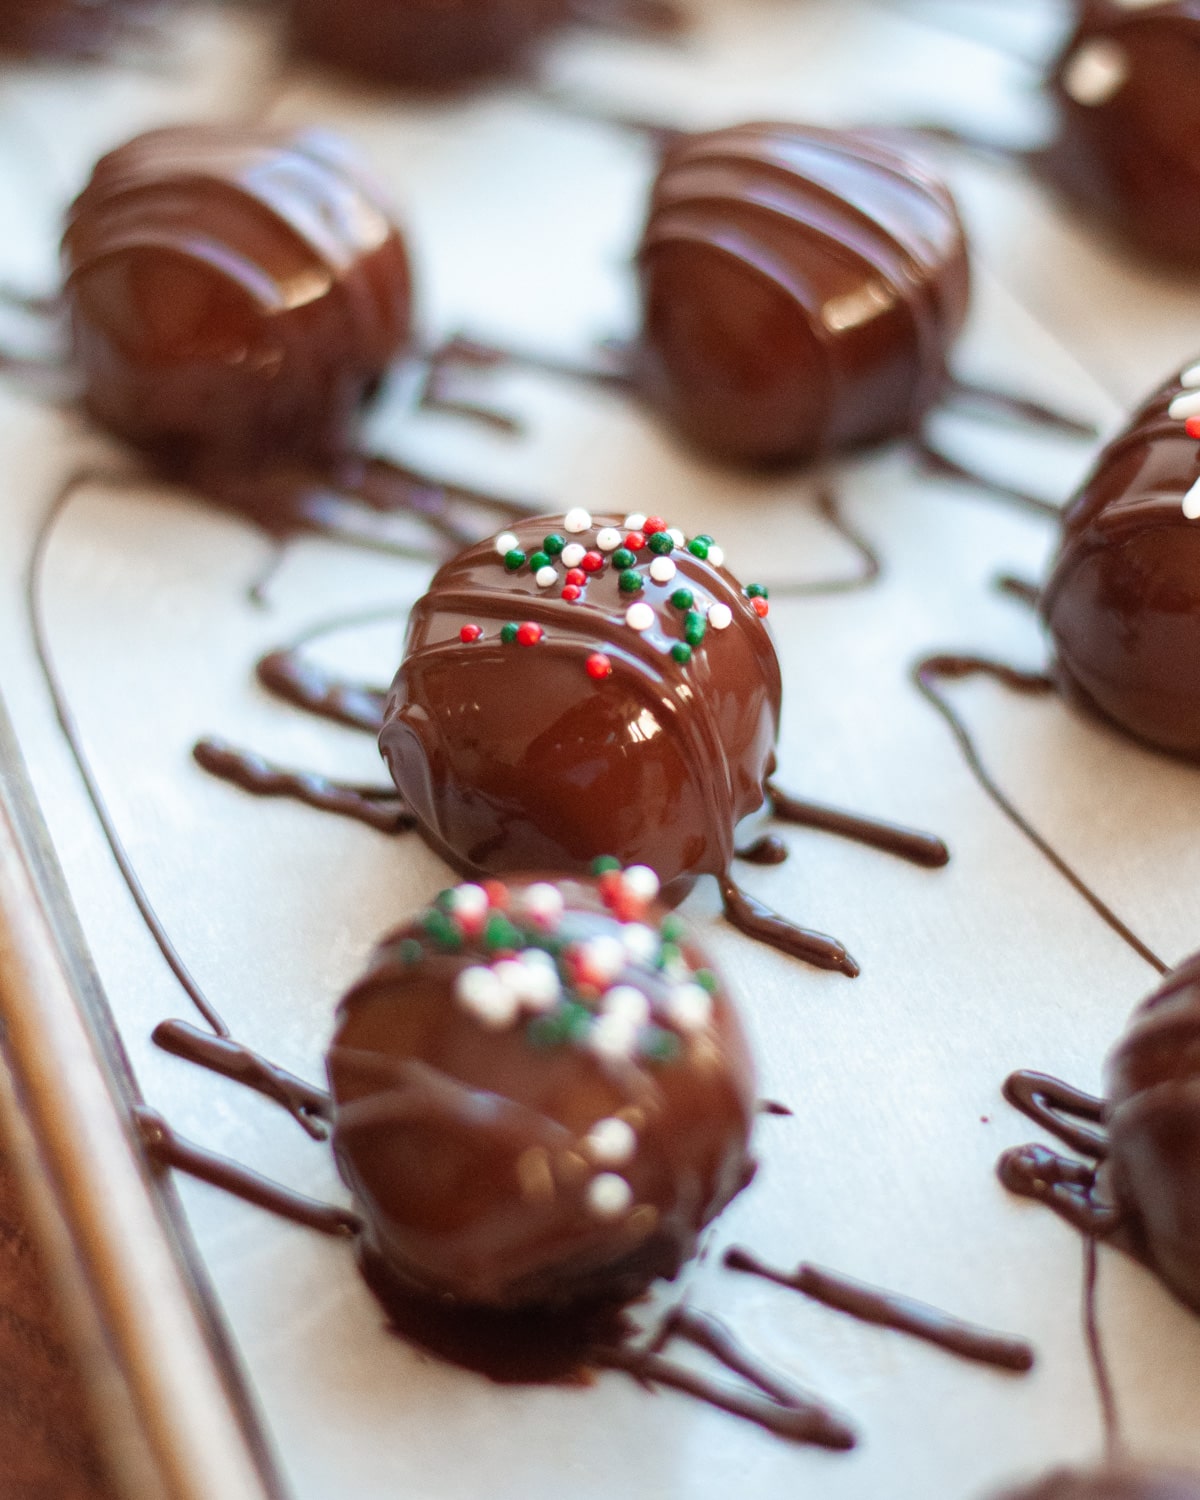
Add optional decorations (sprinkles, crushed Oreos, etc.) immediately to ensure they stick. This is also the time to add chocolate drizzle if desired. Chill dipped truffles for 10-15 minutes in the fridge (or freezer) to set the chocolate.
Oreo Truffles Recipe Variations & Substitutions
- Make them festive with holiday sprinkles. For these photos, I’ve used Christmas sprinkles to decorate. But you can make Oreo truffles anytime of year (and I highly recommend that you do!). Select sprinkles for whatever holiday you’d like to make these for. Pink and red sprinkles for Valentines Day, pastel sprinkles for Easter, spooky sprinkles for a Halloween party, etc.
- Use candy melts instead of chocolate for a pop of color. If you’d like to have a specific colored coating on your Oreo balls, using candy melts is a great option. You could use school colors for a graduation party, red and green for the holidays, or pastels for a spring event of baby shower.
Gluten Free Oreo Ball Recipe & Other Dietary Concerns
This Oreo ball recipe is vegetarian, and can also be made gluten free!
- To make these Oreo cheesecake balls gluten free you will need to purchase gluten free Oreos. Luckily, these are much easier to find than they used to be, making this a great gluten free no bake dessert option with this minor modification.
- Since cream cheese is a main ingredient for Oreo truffles, it may be challenging to modify this recipe into a dairy free dessert option. However, if you cannot have dairy and have found a suitable non-dairy cream cheese substitute, you could try using it in this recipe. Please note, I have not tried to do this and cannot tell you what the outcome will be.
- Similarly, with a main ingredient being cream cheese, this will be a tough recipe to alter to meet a vegan diet. Additionally, Oreos are not considered vegan friendly (they are stated to have milk as a cross contact). If you abide by this diet and have found alternatives for both of these ingredients, you could try using them but I cannot tell you how the final result will turn out.
Oreo Truffle Recipe Tips
Tips for Melting Chocolate
Melting chocolate can be frustrating if your chocolate seizes up (it happens to the best of us). There are a few methods to melt chocolate:
- I have the most consistent success using a double boiler over medium heat on the stove. You can also create a DIY double boiler using a small saucepan plus a glass or metal bowl.
- Alternatively, you can melt chocolate in the microwave. Be sure to keep an eye on it and stir it frequently. If melting in the microwave, I recommend heating in 20-second increments, stirring in between (you’ll check the melt-status of your chocolate as you stir). Once you see almost all of the chocolate ‘lumps’ are gone, continue to stir to encourage it to melt without additional heat. Your chocolate is ready once it is totally smooth.
- Bar chocolate will melt better and result in a nicer coating than chocolate chips because it doesn’t have stabilizers in it like chips do (which helps chocolate chips hold their shape during baking).
Best Way to Dip Oreo Truffle
Getting a beautiful and smooth finish in your Oreo balls can be a little challenging, but these tips will help you achieve the perfect chocolate coating:
- Make sure that your chocolate is melted and stirred until smooth before dipping.
- When your chocolate is melted and ready to go, you’ll want to move quickly to ensure your chocolate doesn’t begin to harden. Have a fork ready and optional sprinkles nearby so you can keep things moving once you’ve begun dipping.
- Place your Oreo cookie ball on a fork and then dip it into the chocolate (or spoon chocolate over the ball). Gently tap the fork on the side of the bowl to remove excess chocolate and create the smooth finish.
- If it’s helpful to you, use a toothpick to help push the dipped Oreo ball onto the parchment paper.

How to Store Oreo Truffle Balls
Oreo balls can be kept in an air-tight container in the refrigerator for up to 1 week.
You can also freeze Oreo truffles for 2-3 months! Do a “flash freeze” of your truffles on a baking sheet for 1-2 hours before placing them in a zip top baggie (or air tight container of choice) to be frozen. Place truffles in the refrigerator to thaw when ready to enjoy.
Oreo Truffles Recipe FAQs
Yes. Because Oreo truffles contain cream cheese they need to be refrigerated. According to the FDA, cream cheese should not be left out longer than 2 hours.
You can freeze Oreo truffles for 2-3 months. Do a “flash freeze” of your truffles on a baking sheet for 1-2 hours before placing them in a zip top baggie (or air tight container of choice) to be frozen. Place truffles in the refrigerator to thaw when ready to enjoy.
Using a food processor to make Oreo truffles creates the best filling because it finely grinds the Oreo cookies to create a smoother texture. A blender will also work. If you do not have either of these pieces of equipment, don’t fret! Place your cookies in a plastic bag and crush the cookies with a rolling pin. Then mix together with a stand mixer, hand mixer, or the good old fashioned way with a wooden spoon and large bowl.
There are a couple of ways to do this. My favorite way is to use a small cookie scoop portion out my truffles. Alternatively, you could use a Tablespoon measure.
There are a few reasons your Oreo balls may be oily.
1) You’ve used a little too much cream cheese (don’t worry, they’ll still taste good).
2) Your Oreo balls aren’t cold enough. Chill them a little longer before rolling and/or dipping.
There are a few reasons your Oreo balls may falling apart.
1) You haven’t used enough cream cheese in your filling. If your filling isn’t rolling into a nice ball, place the ingredients back into your bowl (or food processor or blender) and mix in a little more cream cheese.
2) The chocolate is too hot. If your Oreo balls are falling apart while you’re dipping them, let the chocolate sit for a few minutes to cool down a little bit and then try again.
One batch of our recipe makes 24 Oreo truffles.
Yes! This is a great option if you’d prefer to freeze your inside mixture (or are running low on fridge space for chilling).
Love This Recipe? You May Also Enjoy


Recipe for Oreo Balls
Ingredients
- 30, regular Oreo cookies
- 5-6 oz cream cheese (softened / at room temperature)
- 10-12 oz chocolate of choice*
- Optional: decorations (such as sprinkles, additional chocolate, or crushed Oreo pieces)
Instructions
- Line a cookie sheet with parchment paper and set aside
- Make your filling: crush the Oreos in a food processor until the cookies have been ground finely. Then add 5oz of cream cheese into the basin of the food processor (this works best if the cream cheese is split into a few pieces). Blend together to make a consistent, smooth filling. If the filling is too dry or not coming together, add a little more cream cheese
- Roll your filling into 1” balls: evenly scoop out your filling and roll into 1” balls. Place each ball on the cookie sheet and continue to roll until all filling has been used (will create approximately 24 Oreo balls)
- Chill Oreo balls for 15-20 minutes in the refrigerator
- While Oreo balls are chilling, place your chocolate in your melting vessel (double boiler or microwave safe bowl). When Oreo balls are about ready to come out, melt your chocolate (either on the stovetop, or in 20 second increments in the microwave)
- Dip the chilled truffles into the chocolate to completely coat and place back on the parchment lined cookie sheet
- Chill to harden chocolate. Allow Oreo balls to chill in the refrigerator for at least 10 minutes before you eat them to allow the chocolate coating to harden
- Store in an air-tight container in the refrigerator
Jessica says
I just tried making these . So easy and so good but how do you make the chocolate look so perfect over the oreo ball? Iam having trouble getting it just right
Meredith says
Hi Jessica! I’m so happy to hear you thought these were easy and delicious! Yes, the chocolate coating can be a little tricky. I’ve had the best luck making sure to chill the balls before dipping, and then using a fork to lift and dip the balls into the chocolate. You can gently tap the fork on the side of your chocolate bowl after dipping to help smooth out the coating (and also get rid of extra that may give your oreo balls chocolate “feet” or a puddle under them when you transfer them to the pan to dry). I hope that tip helps!! Let me know if you give it another shot – I’d love to hear how it goes!
Terry Lucey says
Wow…these are so good!!!
Meredith says
I’m so glad you liked them! Thank you for giving these a try.
Steve B says
They were the hit of the party! Thanks for a great recipe 🙂
Meredith says
so happy to hear it! thanks for making my recipe.
Brenda McMancus says
These are so great! Came together really easy too.
ourlovelanguageisfood says
I’m so happy to hear it! Thank you for making my recipe.