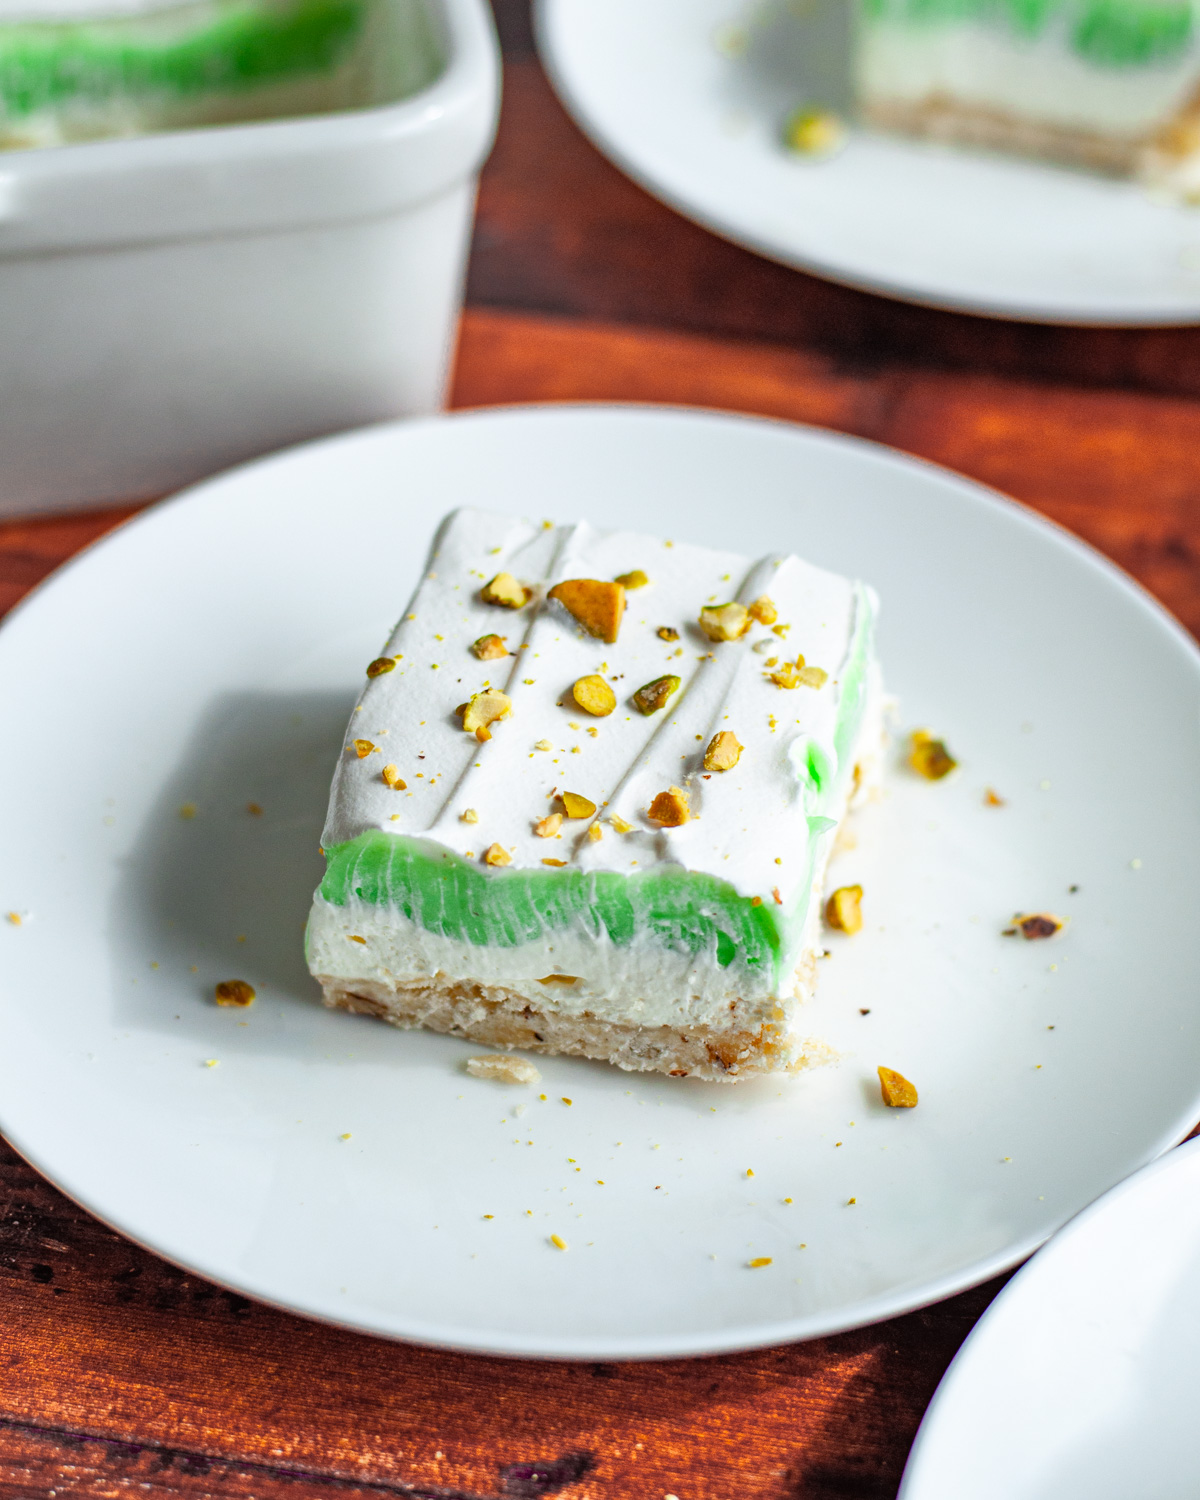
Aunt Becky’s layered pistachio dessert bars are one of our go-to desserts for summer potlucks and entertaining because they’re one of those classic, no-fuss desserts that looks fancy but comes together easily with just a handful of ingredients. Using a couple convenient “short cut” ingredients that result in a gorgeous, layered dessert with minimal effort is this dessert’s superpower. These tastes like something you’d order at a bakery but are really easy to create at home.

I pulled this “pistachio tart” recipe from my aunt out of my recipe binder to share with you because it’s just so fun and delicious! I actually made these for the first time by myself in college for my boyfriend (now husband), and we still talk about how good they were! I’m pretty sure this dessert had something to do with him falling in love with me… or it was just the cherry on top. Either way, these bars have become a staple in our dessert rotation, and every time I make them, people ask for the recipe.
This is such a classic, Midwest-style dessert. Using convenient “short cut” ingredients like Cool Whip and pudding mix is the easy, old-fashioned way to create something impressive without spending hours in the kitchen. And bringing a pan of bars to a gathering is a very Midwest thing too. These bars are the perfect representation of the casual, crowd-pleasing approach to Midwestern entertaining. Whether you’re heading to a potluck or hosting a summer gathering, this recipe is sure to be a total crowd-pleaser.
You’ll Love This Layered Pistachio Dessert
Easy to make. Thanks to using classic convenient ingredients like Cool Whip and instant pudding mix, even a beginner can make this!
Great for gatherings. These bars are the ultimate potluck or summer entertaining dessert. They can be made ahead, transport easily in the pan, and are always a hit.
Creamy and delicious. The combination of textures from the buttery shortbread crust, to the creamy cheesecake filling, pistachio pudding layer, and whipped topping creates a dessert that’s a delight to eat and each bite feels special and delicious.
Ingredients for Layered No Bake Pistachio Cheesecake Bars With Shortbread Crust

- All-purpose flour. Forms the base of your shortbread crust and provides structure.
- Granulated sugar. Sweetens the crust and adds just enough sweetness to balance the other layers.
- Salted butter. Creates that rich, buttery crust that everyone loves. Salted butter adds a touch of flavor to the crust.
- Walnuts or pecans. Adds texture and a nutty flavor to the crust that complements the pistachio filling. And back when this recipe was at it’s height of popularity, these types of nuts were likely easier to get too.
- Cream cheese. The foundation of your cheesecake layer. Make sure it’s at room temperature or it will be lumpy!
- Cool Whip. Creates the light, fluffy texture of the cheesecake layer and is also used as the top layer by itself. Be sure it is thawed before using it!
- Powdered sugar. Sweetens the cheesecake layer and helps create the right texture.
- Pistachio instant pudding mix. The flavor star of this dessert! This easy ingredient adds intense pistachio flavor and that beautiful green layer without any hassle.
- Milk. Combined with the pudding mix to create the pudding layer.
All ingredient measurements and complete recipe details can be found in the recipe card at the bottom of the page.
Helpful Equipment
You don’t need any special equipment for this recipe, just some kitchen basics. A 9×13 pan for baking the crust and chilling the layers is required. A hand mixer or stand mixer is helpful for beating the cream cheese filling until it’s smooth and lump-free (whisking by hand would take a really long time). A rubber scraper is essential for getting all of the filling out of the bowls and spreading the different layers into nice, flat layers throughout the dessert. A pastry cutter helps you make the shortbread crust easily, but you can also do this with a fork or your hands.
How to Make Layered Pistachio Dessert
Preheat your oven and prep the pan. Preheat the oven to 350°F and lightly grease a 9×13 pan (or optionally line with parchment paper, which is helpful if you plan to pull your bars out of the pan) and set aside.

Make the crust. In a medium mixing bowl, stir together the dry ingredients (flour, sugar, chopped nuts) for the crust. Then cut the COLD butter into the mixture until it resembles coarse crumbs.

Press this mixture firmly into a greased 9×13 pan. Using a rubber scraper can help get a nice, flat layer.

Bake for 15 minutes until lightly golden. Remove and let cool completely before adding the next layer.

Make the cheesecake layer. Using an electric mixer, beat the softened cream cheese, thawed Cool Whip, and powdered sugar together until smooth and fluffy.

Spread this mixture into an even layer over the cooled crust, using a rubber scraper to get it into all the corners.

Make the pudding layer. In a medium bowl (or 4 Cup liquid measuring cup), beat together the pistachio instant pudding and milk until thick.

Spread the pudding over the cheesecake layer, again using a rubber scraper to ensure it reaches all the corners and is evenly distributed.

Add the whipped topping. Spread the remaining thawed Cool Whip over the pudding layer as the final topping.

Chill. Cover and refrigerate at least 2 hours (up to overnight).

Serve and enjoy! Cut into squares in the pan, or transfer bars to a serving tray, and enjoy!
Variation Ideas for Our Pistachio No Bake Cheesecake Bars (with Pistachio Pudding Mix)
- Add a sprinkle of chopped pistachios on top. My family has never done this, and texturally we like it without nuts on top. However, adding a sprinkle of chopped pistachios is a nice way to showcase the bar’s flavor and add a pop of color if desired.
- Try different nuts in the crust (or skip them!). Walnuts or pecans is what my aunt has always used, but using chopped pistachios would be an obvious substitution to go along with the pudding! If preferred, you could also leave the nuts out (we have a plain shortbread cookie crust for our pumpkin pie bars, and it’s a delight!).
- Use different pudding flavors. There are so many fun instant pudding flavors you could try in this dessert that would give you a completely different flavor profile while keeping the same easy technique! Lemon topped with a little lemon zest, butterscotch, vanilla, or chocolate pudding mix topped with chocolate shavings, cookies and cream toped with crushed Oreos, coconut cream topped with some toasted coconut… if you have a pudding flavor you love, why not give it a try?!

Expert Tips for Making This Dessert
Make sure your cream cheese has been softened to room temperature. Cold cream cheese will be difficult to mix and you’ll end up with lumps in your cheesecake layer. Take it out of the fridge at least 20-30 minutes ahead of time. In a pinch, I’ve been known to throw the box into my pocket to attempt to warm it faster (works great for butter too by the way) or you can unwrap it and soften it in the microwave on low power in intervals of 10-15 seconds (but this can be a bit risky, melting your cream cheese or making it watery if you’re not keeping an eye on it).
Thaw your Cool Whip completely. Don’t try to use it straight from the freezer. Place the container in the fridge to thaw the day before you want to make this (it takes at least 4 hours to thaw it in the fridge).
Spread everything into the corners. Use a rubber scraper to make sure each layer gets spread all the way into the corners of the pan and is evenly distributed. This ensures every bar has all of the layers.
How to Store Layered Pistachio Dessert
Store these bars tightly covered with plastic wrap (or in an airtight container) in the fridge for up to 4 days.
Layered Pistachio Dessert FAQs
In the recipe world, “no-bake” related to anything in the cheesecake realm refers to the filling, not the crust. The whole point of a no-bake cheesecake is that you don’t have to bake a traditional custard-style filling using a water bath method (which can be intimidating and fussy). You’re simply mixing ingredients together and letting them set in the fridge. So to be consistent with the rest of the internet, we’re labeling this dessert with a quick-baked shortbread crust part of the no-bake category.
Yes! You can make these bars up to 2 days in advance and keep them in the fridge, which makes them perfect for potlucks and entertaining. Be sure to cover them tightly to keep them fresh.
This usually means the cream cheese wasn’t at room temperature when you mixed it with the other ingredients because cold cream cheese doesn’t blend smoothly into other ingredients. If your filling is already lumpy, you can try blending it in a blender for a smoother result.
You can make your own homemade whipped cream! To do so, add 2 cups of cold heavy cream, ¼-1/2 cup powdered sugar (depending on how sweet you like it), and a small splash of vanilla extract to a large mixing bowl and whip with an electric hand mixer or stand mixer with a whisk attachment. Do this until thickened and stiff peaks form (about 3-5 minutes).
Just note, if you’re using fresh whipped cream, the texture and stability will be slightly different and it will be best to serve your dessert right away after the chill period (Cool Whip is designed to hold its texture, and therefore can keep it’s texture in the fridge for much longer).
Absolutely, these travel really well! Keep them in the 9×13 pan and cover tightly with plastic wrap or foil. Transport them in a cooler with ice packs to keep them cold. Once you arrive, place the pan in the fridge until ready to serve. Then you can slice them into bars right in the pan or transfer them to a serving platter.
Love This Recipe? Try One of These Easy Dessert Bars Recipes Next!
Oh hey, did you make this one? ⭐⭐⭐⭐⭐

Drop a 5-star rating and leave me a comment below! It genuinely helps this little corner of the internet grow, and I read every single one. You can also tag me @ourlovelanguageisfood on Instagram (I love seeing your versions!). Want more recipes like this? Join my weekly newsletter and I’ll send them straight to you!
Layered Pistachio Dessert (Aunt Becky’s Pistachio Tart)
Equipment
- Electric Hand Mixer -OR- Stand Mixer with Whisk Attachment
Ingredients
For the Crust
- 1 + ½ Cup all-purpose flour
- 3 Tablespoons granulated sugar
- ½ Cup salted butter
- ½ Cup walnuts or pecans, chopped
For the Cheesecake Layer
- 8 ounces cream cheese, softened
- 10 ounces Cool Whip whipped topping, thawed*
- 1 Cup powdered sugar
For the Pudding Layer
- 2 , 3.4 ounce packages instant pistachio pudding
- 2 + ½ Cups milk (2% or whole milk preferred)
For the Topping
- 6 ounces Cool Whip whipped topping, thawed*
Instructions
- Preheat the oven and prep the pan. Preheat the oven to 350°F and lightly grease a 9×13 pan (or optionally line with parchment paper, which is helpful if you plan to pull your bars out of the pan) and set aside.
- Make the crust. In a medium mixing bowl, stir together the dry ingredients for the crust. Then cut the cold butter into the dry ingredients until the mixture resembles coarse crumbs. Press this mixture firmly into a 9×13 pan and bake for 15 minutes until lightly golden. Remove and let cool completely before adding the next layer.1 + ½ Cup all-purpose flour3 Tablespoons granulated sugar½ Cup salted butter½ Cup walnuts or pecans, chopped
- Make the cheesecake layer. Using an electric mixer, beat the softened cream cheese, thawed Cool Whip, and powdered sugar together in a large mixing bowl until smooth and fluffy. Spread this mixture into an even layer over the cooled crust, using a rubber scraper to get it into all the corners.8 ounces cream cheese, softened10 ounces Cool Whip whipped topping, thawed*1 Cup powdered sugar
- Make the pudding layer. In a medium bowl (or 4 Cup liquid measuring cup), beat together the pistachio instant pudding and milk until thick. Spread this over the cheesecake layer, again using a rubber scraper to ensure it reaches all the corners and is evenly distributed.2 , 3.4 ounce packages instant pistachio pudding2 + ½ Cups milk
- Add the whipped topping. Spread the remaining thawed Cool Whip over the pudding layer as the final topping.6 ounces Cool Whip whipped topping, thawed*
- Chill and serve. Refrigerate at least 2 hours (up to overnight). Then cut into squares in the pan, or transfer bars to a serving tray, and enjoy!
Notes
- Add a sprinkle of chopped pistachios on top. My family has never done this, and texturally we like it without nuts on top. However, adding a sprinkle of chopped pistachios is a nice way to showcase the bars’ flavor and add a pop of color if desired.
- Try different nuts in the crust (or skip them!). Walnuts or pecans is what our original recipe uses, but using chopped pistachios would be an obvious substitution. If preferred, you could also leave the nuts out.
- Use different pudding flavors. There are so many fun instant pudding flavors you could try in this dessert that would give you a completely different flavor profile while keeping the same easy technique! Lemon topped with a little lemon zest, butterscotch, vanilla, or chocolate pudding mix topped with chocolate shavings, cookies and cream toped with crushed Oreos, coconut cream topped with some toasted coconut… if you have a pudding flavor you love, why not give it a try?!

Leiah Fundell says
This was so good!! Can’t wait to vary it up with different flavors like raspberry or strawberry!
Meredith says
I’m so glad you enjoyed it, and I can’t wait to hear how the other flavors go too!
Meredith says
Always a classic / always a hit!